
There are many reasons why someone may want to remove a car radio: to replace it with an improved version, to upgrade the interior, or to repair the existing stereo, but whatever the reason, installing a new radio is almost always easier than it looks.
So if you need to remove and install a car radio, just follow this easy to follow, step-by-step guide on the correct procedure.
However, this guide covers only the basic steps, and your particular installation might differ in some ways, but all the steps in this guide cover the most important aspects of installing a car radio.
If you need specific information on your particular installation, such as wiring diagrams, use this resource to access the required information.
Radio Replacement Video Tutorial:
You will need:
At a minimum, you will need the following tools and equipment, although this list may vary depending on the car, the model, and the radio involved:
• Medium flat blade screwdriver
• #2 Phillips screwdriver
• Trim panel removal tool
• Wire cutters.
• Wire stripper/crimping tool
• Soldering iron
• Acid core solder.
• Heat shrink tubing
• DIN tools.
• Heat gun
Removing the original radio.
NOTE: Due to different dashboard designs, some radios are more difficult to remove than others, so if you require detailed, specific information on how to proceed, use this resource to access the required information.
TIP: If you do not have access to detailed information for your specific installation, take detailed, high resolution pictures of every step in the removal process, since you need to install the replacement radio in the exact reverse order of removal, and it always handy to have pictures for reference purposes.
As a first step in the removal process, engage the parking brake, and disconnect the negative battery terminal to prevent accidental short circuits during the installation procedure. Factory fitted radios will be mounted in one of the following two ways:
- Mounted in a metal sleeve, and secured by several spring clips
- Bolted to the dash and/or surrounding body work by an arrangement of steel spring clips
If the radio is secured by spring clips, you will notice four small holes on either side of the radio face. Insert the DIN tools into holes until you hear a soft click- this means the spring clips have been released. Spread the DIN tools apart slightly, and use the tools to extract the radio from the mounting sleeve.
Bolted in place?
In cases where the radio is secured with bolts, you may need to remove several trim panels to gain access to the mounting bolts.
Spend a few minutes to study the layout of the surrounding trim, and start by removing the panels that are easiest to remove. Look for hidden screws securing trim panels, but NEVER use force to pry, or lever trim panels from the dash board.
As you proceed, the locations of the securing bolts will become clearer. Only remove as much of the dashboard as is required to free the radio from the dash board.
However, take careful note of all wiring under the dash board; you may have to disconnect some wiring to gain access to the securing bolts, so take pictures to enable you re-connect all wiring.
NOTE: Some cars of American manufacture up to the mid-1980’s had their radios secured with two nuts around the tuning knob and volume control shafts.
These radios can only be installed from behind the dash board, and gaining sufficient access past wiring, air conditioning ducts, and heater controls can be challenging.
Removing the old radio.
If the old radio was pre-wired with a “stereo prep” set-up, there will be wiring harness and electrical connector behind the unit. This harness connects the radio to the car’s electrical system and speakers, so disconnect this harness, unplug the antenna, and remove the old radio from the car.
Installing the new radio
NOTE: It is very easy to get wiring connections wrong, which can cause irreparable damage to both the new radio and the car’s electrical system. If you are unsure about which wire connects to which, use this resource to access detailed, and specific wiring diagrams for your particular installation.
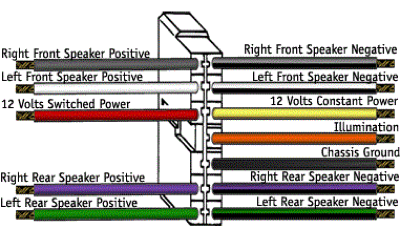
Alternatively, refer to the diagram below to identify the various wires (and their functions) on the replacement radio; most radios use a standardized color-code, but be sure to also refer to the installation instructions that came with the new radio to clear up any doubts about the function of each wire.
Basic color coding on radio wiring diagram:
How to make the connections:
Although crimping the connections is fast and easy, crimped connections have been known to fail. Therefore, we recommend that all connections be soldered with acid-core solder, and that all connections be protected and insulated with heat shrink tubing.
Slide a length of heat shrink over one part of the wire before the connection is soldered, solder the connection, and shrink the tubing over the connection with about one inch of tubing on either side of the joint. This will keep the joint insulated, and protected from moisture.
Avoid merely twisting the wires together and taping the joint shut. Apart from the fact that the tape can fall off, an unsoldered joint can cause poor speaker performance, as well as damage to the radio when the power supply is interrupted intermittently as the joint fails, or shorts out against something.
NOTE: It is crucially important to provide the new radio with a solid ground connection to ensure the proper functioning of the radio. If you are not splicing into the car’s harness, look for a screw, bolt, or other fastener to use to get a ground contact with bare metal. However, do not just twist the ground wire (usually yellow) around the bolt or screw- use a proper ring terminal under the fastener to ensure proper contact, without which the radio will not work.
Fitting the new radio
Assuming that you purchased a mounting kit with the new radio, follow the instructions that came with it to prepare the dash board to receive the new radio. However, do not fit the new radio before testing it; plug in the antenna, reconnect the battery, and test all the functions of the new radio.
Pay particular attention to signal noise, speaker balance, and general sound quality.
Correct any mistakes made during the wire connection process, if any, fit and secure the radio, and replace all trim panels in the exact reverse order of removal, and remove all tools from the car.
Congratulations! You have just performed a radio installation, and saved a ton of money in the process. Enjoy!

No Comments