
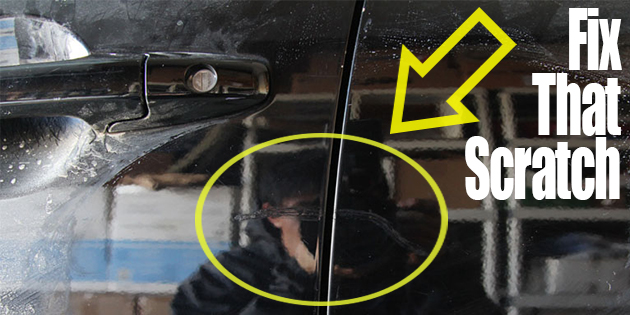
Most people that walk by your car won’t even notice that deep scratch.
But to you, that annoying scratch completely sabotages your car’s aesthetics and brings down its value by thousands of dollars in your mind.
What if you were able to get rid of that scratch? By the end of today it is possible for that scratch to be no more.
This article will cover a few different ways for you to fix a deep scratch on a car. Let me know which method worked for you in the comment section below.
You’ll be learning 2 different methods for fixing deep car scratches. Both are fairly simple and can be done perfectly as long as you take your time and don’t rush things.
If you enjoy this article, do us a big favor by sharing this post on social media. It takes two seconds to do and helps us tremendously. Thanks!
Fixing a deep scratch: Recommended method
This first method is the most professional way to get the job done. The most challenging part of it is taking your time and acquiring the color-matched spray paint.
After you are done, your scratch should be invisible. Especially if you have a black car where scratches, dust, and any scrapes are extremely noticeable, this will make a big difference.
What you will need:
- Sandpaper
- Isopropyl alcohol
- Soft towel (or any type of buffer)
- Color-matched paint
- Auto polish
Acquiring color-matched paint: Before we get into how to fix a deep scratch on a car, it’s worth mentioning where you can purchase color-matched paint.
Color-matched spray paint can be mixed at certain auto part stores. This is dependent on your location but it’s worth checking out.
The next route you have is to look online. PaintScratch.com and APSTowerPaint.com are recommended websites to find color-matched paint.
In order to purchase the right paint you’ll need to know your car’s color code. Use this tool for easy directions on how to find the paint codes on any car/truck.
Step 1: Sanding
Begin by sanding the surface where your scratch is. The goal here is to rough up the old surface, removing the paint so that your new paint will stick. Also, make sure to sand the inside edges of the scratch to make the surface smoother.
Don’t rush this step! The quality of your preparation will always be seen in the final result of your paint job.
Step 2: Degreasing
Start degreasing the scratch with Isopropyl alcohol. This is another important step that will help assure you a much cleaner paint job at the end. Not only will this help paint stick better but it will also remove hard-to-see dust that will only be noticeable when there are specs in your paint job.
Step 3: Painting
Next, you will want to paint over the scratches. You’ll want to do this in at least a few layers so that it covers up the scratch. Wait 5-10 minutes between each layer depending on how hot it is outside.
Step 4: Back to sanding
Now you’ll want to use some light sandpaper to make your paint job flush with the rest of your car. There should be no noticeable change in height when brushing your hand across the car.
Step 5: Buffing/polishing
Here’s where you’ll get to see your paint job come to life!
Use an automotive polish of your choice and polish the scratch area. You can use a buffer, but it is not necessary. Any non-scratch rag/towel will be fine for small areas.
Step 6: Sit back and be proud!
If you’ve made it this far, hopefully your scratch is gone.
If the paint looks off or the scratch is still very visible, review the video above and reread my instructions. Don’t take it lightly when I say “Don’t rush”. Anyone who makes a living from painting cars will agree that the secret to a good paint job is in the preparation.
Method 2: The touch up paint version
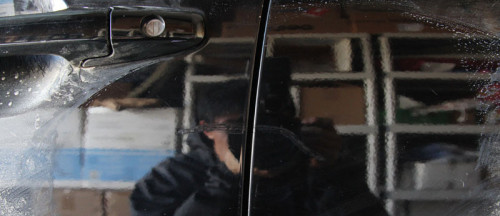
Here is another awesome way for you to remove that annoying scratch. It is quite similar to the previous method but is also a little easier. I originally picked up this method from this page.
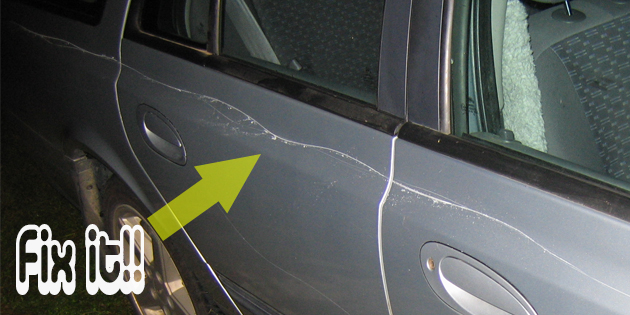
The image above shows the scratch we’ll be working with. It is not an insanely deep scratch, but I’d still consider it deep.
What you’ll need:
- Sand paper
- Automotive polish (you can also get polish from scratch removal kit)
- Towel (or buffer if you have one)
- Touch up paint
Step 1: Paint
the first step is to apply the touch up paint. The purpose of it is to fill the crack. Don’t worry if it looks a bit ugly or excessive at this point. It will be sanded down later. The most important part is that the crack gets filled.
A good idea would be to clean the surface before you do this. Ideally you should use isopropyl alcohol, like in the last method, but you can get away with a basic cleaning job using a damp towel. (Make sure to dry it off before painting.)
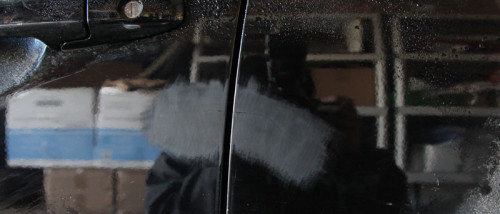
Step 2: Wet sand it
Next, you’ll want to wet sand the scratch with light sandpaper. Make sure that the scratched area is flush with the rest of the car. I included an image above to give you a better idea of what the sanding job should look like.
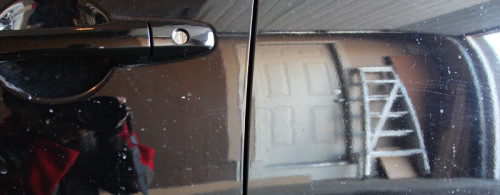
Step 3: Polishing
Now all you have to do is polish the scratched area. If all went accordingly, your car should have a similar improvement to the image above.
Step 4: You’re done!
Congrats!
I hope your scratch is gone! This method is fairly painless and can remove the eyesore of a deep scratch.
Final Notes:
I hope you have enjoyed the article! Fixing deep car scratches is something that everyone should be able to do theirselves. This is another small task you can do to avoid spending money at the auto shop.
Once again, if you have enjoyed the quality of this article and are willing to share it on Facebook, Twitter, or any social network that you prefer, it would be greatly appreciated. Thanks for reading!
No Comments