
If you have a dent in your car I can imagine you are a bit frustrated. Who wouldn’t be?
There are multiple choices you have when this happens. You can bring your car to a shop or you can fix it yourself.
Since you are reading this article, I’m guessing that you want to learn how to fix car dents on your own. Well you’re in luck! This article will cover just that!
Material List:
- Bondo
- Cutting compound
- Color-matched spray paint (more on acquiring this kind of paint later in the article)
- Spray Puddy primer
- Clear coat
- Masking tape
- Spare newspaper
Tool List:
- Respirator mask
- Sandpaper
- Angle grinder
- Orbital sander
How to fix dents for cheap:
The video above goes over an awesome way for you to fix dents on a budget. It might not be the best option for really expensive cars but this is a lot cheaper than taking your car to a mechanic and certainly easier than buying a whole new body panel.
Step 1: Get the dent as flat as possible
The first step to this repair is to get the dent as flat as possible. It becomes a bit easier when you jack up your car to do this.
Step 2: Remove the paint and primer
To accomplish this, use either an angle grinder or an orbital sander. Keep in mind that this will heat up your car and could warp the metal pretty easily. Take short breaks as you go to let the panel cool down.
Step 3: Applying the Bondo
In the video, you will notice that they refer to a product called ‘Bog’. The US equivalent to this is Bondo. They both work essentially the same, but Bondo looks a bit different.
You’re going to want to apply the Bondo in layers. If you put it all on at once, it could crack from heat and ruin the repair.
Step 4: Sanding
This is the step where you’ll really notice your dent disappearing. Sand the Bondo so it is completely flush with the rest of your car. There should be no change in height whatsoever.
Step 5: Spray puddy primer
Primer is what’s needed to help the paint stick to the sanded down panel. In the next couple of steps we’ll be constantly sanding and priming to get ready for paint. Don’t rush on these steps because they are crucial.
Step 6: Sanding (again)
Repeat the sanding process the same as last time. make sure everything remains completely flush. Not only should it be flush, but it is also important that the panel is smooth. The slightest bit of texture will mess up how the final paint job will look.
Recap so far:
If you have gotten this far you are in great shape!
For only a couple hundred bucks (or less) you have fixed your dent.
All you need is paint now. The two options you have is to bring it to a paint shop or to do it yourself.
Down below, I’ll be discussing how you can paint your car on your own, without the need of spending money at a paint shop.
Painting:
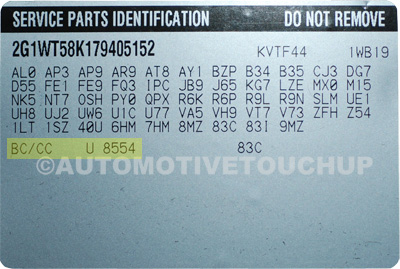
Example paint code on a Chevrolet.
The video above will give you a great idea on how to paint your ride. Down below is a textual explanation of what is mentioned in the video. It will be a very helpful way to refer to topics in the video.
Step 1: Finding your paint codes
There are a number of ways to find your car’s paint code. You can go to an auto store and have someone help you for free, but it is easy enough to figure it out yourself.
Start by visiting automotivetouchup.com/paint-code.htm. There you will be able to choose the maker of your car and it will present you with super simple directions on where to find your car’s paint code. Simple!
Step 2: Getting paint
There are an endless supply of paint colors. The slightest color mismatch will stick out like a sore thumb on your car.
Getting color-matched spray paint is a bit easier in some places rather than others. You can try your local auto parts store. In the video, you can see that their closest auto parts store had its own paint mixing station.
If all else fails, go online! PaintScratch.com and APSTowerPaint.com are great sites to check out.
Step 3: Masking
Masking a car is pretty simple but important. Start off by running masking tape along the panels. If you’re painting around your wheels, you’ll want to cover those with standard garbage bags.
You can use either newspaper or plastic drop sheets to cover larger areas on your car. Be aware that overspray is something that will happen. It’s better to be safe than sorry when masking your car in preparation to paint.
Step 4: Cleaning off your surface
Clean off your car one final time to ensure that their isn’t any dust that will get in the way of your paint.
Step 5: Preparing for paint
Next, you’ll want to rub back the old paint using some light sandpaper. This will get rid of any noticeable edges that will ruin the paint job later on.
Clean your surface with wax and grease remover. This is what will really clean the surface to make sure your paint job will look great.
If you still have any damage (scratches, small dents, etc), you can spray down some filler primer. If your surface is ready, you can start by throwing on a a coat of regular primer.
You’ll want to do as many coats as possible until you notice a nice, solid coverage of primer. Just make sure to spray the primer on evenly avoiding any runs.
Step 6: More sanding and priming
Now you’ll want to sand the primer again. After you’re done, spray a few more coats of primer.
Your goal is to get the surface as perfectly flat and smooth as possible.
After you’re satisfied, use light sandpaper (600 grit is recommended) to make your surface even more smooth.
It’s more than worth it to take your time on these steps. Anyone who paints cars for a living will agree that preparation is key for a good looking outcome.
Step 7: Painting
Now for the fun part! Painting!
Lay down your base coat using the color-matched paint. Keep your coats even and make sure there is good coverage. It’s important to do a good job on your base coat because it will always be seen. The base coat is the one thing you can’t buff out and start over on.
Apply multiple layers of the base coat until you have an even finish. Make sure to avoid runs! Like I said earlier, it is hard to correct mistakes in your base coat.
Step 8: Clear coat
Like it is mentioned in the video, you shouldn’t rush your clear coat. In the video the sun was going down and they didn’t have the heat needed for a proper paint job, so they waited for the next day. You might be tempted to rush on a coat, but believe me, the wait is worth it.
Spray on as many even coats as possible. If it doesn’t look glossy at first, don’t worry! That is what buffing is for.
Use your cutting compound to buff out the car. An electric buffer will make the job a lot easier, but a cloth will work.
And there you have it!
Final Notes
I hope your car looks amazing! Feel free to send us your car’s before and after pictures by emailing Doug(AT)1CarLifestyle{DOT}com. We’d love to share them!
If you have found this article helpful, I’d appreciate if you’d share it on social media via the links down below. It would help us out tremendously.
Thanks for reading!
Image Credit:
Big thanks to Nick off Flickr for providing the fender bender picture in the beginning of the article.
No Comments