
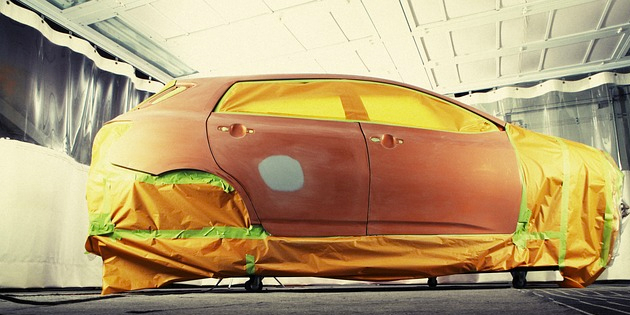
There are any number of reasons why you may want to paint a car yourself. The paint may be faded, or you may want a different color, or you may be restoring a car; whatever the reason though, remember that painting a car is a major undertaking, and one that should not be embarked upon lightly.
Even though you could save thousands of dollars by doing it yourself, painting a car is NOT for everyone. Nonetheless, even if you feel confident enough in your abilities to take on such a mammoth task, we strongly urge you to read this article carefully before you make the decision to paint a car. It is an arduous, difficult, and very expensive undertaking, so before you do anything, read this article on what to do, how to do it, and what NOT to do when you paint a car yourself. Here is how to go about it…
Important Message: Interested in avoiding embarrassing newbie painting mistakes? If so, check out our review of Learn Auto Body and Paint. It will save you a ton of time and money in the long run.
Time required:
Depending on how well you prepare the car for painting, and how skilled you are with a spray gun, the process can take several days.
NOTE: Two factors that influence the time required more than anything else involves the colour of the paint on the one hand, and the type of paint on the other.
Metallic paints are very difficult to apply evenly, and as a rule of thumb, even professional spray painters can take as much a 50% longer to apply metallic paints. Moreover, if you have repaired rust spots, and the color coat you are going to apply is white, red, or any shade of silver, you need to apply a complete coat of primer to eliminate color differences in the final coat.
Of all colors, these three colors are the most difficult of all to apply evenly, and almost impossible to apply to the same depth of color over an unevenly colored surface. Applying a full coat of primer can add up to two days or more to the final time spent on painting a car, so take this into account.
Difficulty level:
- Stripping the car down can vary from easy, to difficult, depending on whether you have to remove the bumpers to strip out the head-, and tail lights. Also bear in mind that to achieve a professional result you need to remove door panels, and other interior trim if you are painting the car a different color. The degree of difficulty in removing trip and panels varies from car to car, so before you do anything, it is recommended that you get a repair manual for your specific vehicle to assess the task at hand.
- Removing the windshield and back window can be very difficult. In some cases, the windows are glued down, and cannot be removed without breaking them.
- Preparing the body work is generally not difficult if there is no rust and accident damage present; however, the degree of difficulty varies with the amount of rust and accident damage that needs to be fixed before you can start painting.
Special precautions:
- Ensure that the environment you are going to prepare and paint the car in is dust-free, and out of direct sunlight.
- Ensure that the work area has proper ventilation to avoid suffocating yourself with paint fumes.
- Ensure that the area has adequate lighting without shadows. You need to be able to see every dust speck and imperfection, and you cannot do that in bad light.
- Always wear a gas mask that is approved for spray painting. Inhalation of paint fumes is dangerous, and cause serious respiratory problems.
You will need:
- Several thousand dollars.
NOTE: There are too many variables to supply even a ballpark figure. Issues like the amount of preparation to repair rust or accident damage, the quality/type of the paint, and the size of the vehicle all play roles in the final estimate.
For DIY jobs, the costs can vary from about $2 500 to as much as $10 000 and more. The best advice we can offer is to shop around for products, supplies, and equipment before you do anything, but be prepared to spend about $2 500 to $3 500 on a car that does not require rust or accident damage repairs.
- Repair manual.
- Sufficient time on painting day to ensure you can complete the entire painting procedure in one go, and without interruptions.
- Sufficient paint of the correct color. If you purchase more than one container, make sure the batch numbers on the containers match to prevent color variation.
- Primer
A NOTE ON PRIMER: Be aware of the fact that not all primers and solvents are compatible with all paint formulations. Make absolutely sure that you buy products that are fully compatible!
- Lots of fine-grit sandpaper. If you are not going to be repairing rust, 1 800-, to 2000 grit paper is ideal.
- If you are repairing rust, you need body filler, hardener, a sanding block, and sand paper from 800-, to 1000 grit.
- Suitable primer to prime repaired rust spots and bare metal.
- Air compressor with an air tank with a capacity of at least 50 gallons. Smaller air tanks drain too quickly, which makes it impossible to maintain the air pressure required to apply modern automotive paints that almost always needs high pressure equipment.
NOTE: Most equipment hire establishments will have suitable compressors available for hire, but make sure they drain the tank to prevent water from mixing with the paint as you spray. Water globules in paint will cause unsightly blemishes that are very difficult to remove successfully without having to repaint an entire panel.
- The best spray gun you can get, as opposed to the best you can afford. Cheap equipment equals poor results, so don’t skimp on this essential piece of equipment.
- You will need more than basic tools. It is recommended that you have available:
- a full set of screwdrivers (Flat, Phillips, and Torx)
- a full set of 1/2-inch drive sockets with a ratchet handle and extension bars
- A full set of combination wrenches.
- An engine hoist with which to remove the engine if you are going to paint the engine compartment.
- High quality dust and gas masks.
- Solvent such as acetone, with which to wipe the car down before you start painting. Acetone removes all oiliness from areas where you touched the body work, and it does not leave a residue that can prevent the paint from adhering to surfaces.
- Plenty of clean, lint free rags.
- Several tack cloths. A tack cloth is a sticky article that is used to remove dust before applying paint to surfaces.
- Lots of old news print to mask off wheels, suspension parts, and the interior of the car to prevent getting overspray on everything.
- Several rolls of masking tape to stick sheets of news print together.
- Jack stands. It is recommended that you remove the wheels from the car to avoid staining rims and tires with overspray. Support the car with jack stands even before you begin preparing the body work.
Step 1.
The first thing to do is to remember that you cannot achieve a good result by sticking masking tape over door handles, windows, mirrors, and exterior trim that must not be painted. Therefore, consult your repair manual, and take at least a couple of hours to read up on how to remove the headlights, tail lights, side lights, side view mirrors, grille, windows, door panels, all exterior trim, and badges. Also be sure to remove the trunk liner, and if you are removing the engine, don’t forget to remove the liner from inside the hood as well.
When all of these items have been removed, you should have a smooth body shell on the exterior, and it should be possible to paint the entire body without having to mask off anything. There is no way to stick masking tape over something, and not end up with either some of the old paint showing, or with an unsightly, raised edge where the new paint met the masking tape.
Step 2.
Once you are sure you know what you have let yourself in for, start by removing all the items listed in STEP 1, but make sure you keep all screws, bolts, spring clips, and other fasteners in separate, labelled containers to avoid confusion and mistakes during reassembly.
Do NOT keep everything you remove in the work area- if you do, you WILL get overspray on everything, so place all removed items as far away from the work area as possible.
Step 3.
If you going to paint the car a different color, you need to paint inside the area where the doors meet the body work as well, and to this successfully, you need to remove the doors from the car. However, this brings it own problems, since the car interior will now be open for overspray to settle on.
If you are up to the task, you can remove the seats, dashboard, carpets, roof liner, and everything else inside the car, which is what we would recommend, but you could also mask off the interior with dozens of sheets of old news print. If you choose this route, you must make absolutely sure that no paint can penetrate your mask when you paint the door sills and posts.
Step 4.
If you remove the doors, strip them down to bare bones. There is no way to paint around the edges and the bottom of the doors without getting overspray on the window and trim, so remove everything from the doors that is possible to remove. Consult the manual on how to remove the glass from the door cavities.
When the doors are stripped down, hang them on a frame with some wire, but make sure they are far enough apart so that you can move freely between them when you paint them. The last thing you want is to touch the wet paint on a door- If you do, you have to remove all the newly-applied paint and start over.
Step 5.
So far, so good. At this point, you should have a bare body shell on the outside, but the windshield and back window might still present a problem. If the glass is stuck down, remove the trim from around the edges of the windows, and mask the glass with news print and masking tape.
However, make sure that the masked area does nor encroach on an area that will not be covered by the trim when you replace it. You need to apply paint right up to the edge of the glass to ensure that no old paint shows through when the trim in place. Repeat this process for all other glass that cannot be removed.
Step 6.
Assuming then that everything is removed from the body work, and that no paint can penetrate the interior, you can start preparing the old paint to accept the new coating. The new paint will NOT adhere to the old surface, and you must provide a “key” for the new paint to stick to by sanding down the entire outside surface of the car.
This process is best performed by dipping a piece of 1 200 grit sandpaper in clean water, and sanding down the surface by hand. Start on the roof, and apply a light pressure; however, avoid sanding in circles. You need to move the sand paper in straight lines, to avoid a “swirling” pattern since it always shows though the new paint.
NOTE: The purpose of this exercise is NOT to remove all the old paint from the car. All that is needed is to remove the top layer of paint, and you will know when you have done this successfully when the entire surface of the car has lost its shine. The entire surface must be dulled, and any shiny spots MUST be dulled to enable the new pint to stick.
Important Message: Interested in avoiding embarrassing newbie painting mistakes? If so, check out our review of Learn Auto Body and Paint. It will save you a ton of time and money in the long r
Step 7.
As you progress with the dulling process, you will generate large amounts of water that is stained with old paint. Make sure this water does not flow onto the news print that masks the windows and interior. You may e able to remove it from the windows, but it will permanently stain the carpets and upholstery. At the same time though, you need to use a much water as you can to lubricate the sand paper to get a smooth finish on the dulled surface.
Step 8.
Assuming that the entire outside surface of the car has now been dulled, and that NO shiny spots remain, you need to remove all the old paint that remains as almost invisibly fine dust. If you have removed the doors, this can be a very time-consuming process, sine you cannot use running water to wash the dust off.
The alternative is to dip a lint-free rag in a bucket of clean water, and to keep on wiping the surface down until the rag comes away clean- meaning that there must be no old paint left of the surface to transfer to the rag. This can hours, but it must be done to achieve a good end-result, so replace the rag frequently, and use as much clean water as it takes to remove ALL of the old paint.
Step 9.
If the old paint was in a good, to reasonable condition, there should not be any bare metal visible at this point. However, if there are bare spots, they MUST be primed with a primer that is compatible with the paint you have, so do this now, and make sure that the primer is dry before you sand it down with 1 200 grit paper. The primed surface must match the surrounding area in smoothness, and there must be no detectable boundaries between the primed area, and the surrounding previously dulled surface.
NOTE: No matter how small the difference between a primed area and the surrounding area is, the difference WILL be exaggerated and accentuated by an amount equal to the thickness of the new paint, so make sure all primer is reduced to the level of the surrounding area.
Step 10.
At this point, it might be good idea to wet the floor of your work area to suppress any dust that might be present. Do NOT sweep the floor now- if you do, it might take days for the disturbed dust to settle, and most of will settle on the car.
Assuming that all the old paint has been removed, all imperfections have been fixed, and that all masked off areas are still masked off, you now need to wipe down the entire surface with the solvent to remove all the oil that has been transferred from your hands when you fixed imperfections. Use clean, lint-free rags to do this, but check the rag frequently for signs of staining.
If the rag stains, it means there is still old paint present on the surface, and it MUST be removed before proceeding.
Step 11.
Again assuming that the body work is now clean, and free of all dust, old paint, and oily residues, use a tack cloth to wipe down the surface to pick up all dust particles that might still be present. As a final precaution against dust, wipe the whole car down with solvent again.
Step 12.
This article assumes that you know how to use a spray painting equipment, so if you do, you can now proceed to paint the car.
WARNING: if you cannot use spray painting equipment, we strongly advise against using this opportunity to learn. Spray painting is a skill that takes years to acquire; which is why you should consider seeking professional advice and assistance from this point on.
Step 13.
Regardless of who painted the car, the paint should be left alone to cure for at least 48 hours before you touch it, and even then, extreme care must be taken to avoid damaging the surface. Ideally, modern automotive coatings should be baked at around 2000C (3920F) for it to cure properly, but then again, very few people have baking ovens in their backyards.
If the paint cannot be baked, you should allow at least 48 hours before touching it, but 7 days or so is even better.
Step 14.
The assembly process is in the exact reverse order of dismantling, but bear in mind that you will be working with a newly-painted car, so take extreme care during the assembly process not to damage the finish.
Re-assembly is best accomplished with the help of a repair manual, so don’t bank on the fact that you think you remember where each screw, bolt, or other fastener goes. At the end of the assembly process you should have NO parts, fasteners, or anything else left over, so double check each step to ensure you are not forgetting anything.
One more thing…
Many online resources will tell you that the final surface will be rough, and powdery. This does NOT apply to modern automotive paints that consist of a base product, and a hardener, or catalyst. With modern coatings, the surface will be smooth, shiny, and of an even thickness after application, and will require NO follow-up buffing or polishing of any kind- provided of course that the paint was applied correctly.
If you used a two-part product and the surface is rough and powdery, there is something wrong, and the paint won’t last for more than a few weeks, or even days before starting to peel. The most common causes of this problem are:
- Insufficient air pressure to force the paint particles to bond to the surface being painted. Most modern paints require a constant air pressure of about 28-30 pounds per square inch.
- Paint that is too thick and does not flow easily enough, which makes the paint particles too big.
- High surface temperatures that cause the paint to cure before it forms a bond with the substrate.
- Incorrect adjustments and settings on the spray equipment, causing the paint particles to be too small.
- Incorrect distance between the spray nozzle and the surface being pained. If the distance is too great (more than about 12-14 inches), the paint particles dry before making contact with the surface being painted, which causes poor bonding.
Any of these causes, or a combination of them can ruin all your hard work, and the only way to fix a rough and powdery surface is to remove all the paint from the car, and to start over. Therefore, we strongly advise (as before) that you do NOT attempt painting a car if you are not skilled, or experienced in the use of spray painting equipment.
How To Paint A Car Yourself… The Right Way!
Interested in avoiding embarrassing newbie painting mistakes? If so, check out our review of Learn Auto Body and Paint. It will save you a ton of time and money in the long r

No Comments