

Despite the fact that fuel injectors are critical components in any fuel injection system, the truth is that fuel injectors are among the most overlooked items during routine car maintenance procedures.
The first time the injectors become an issue is when they become clogged or fail, at which point they often cannot be saved, and must be replaced.
Despite the claims made by thousands of websites and videos, the DIY mechanic is not able to do all of the tests and checks a competent repair shop is capable of performing to diagnose defective fuel injectors, simply because the average home mechanic does not have the required equipment available.
Nonetheless, there are some tests that are doable at home, and for a practical demonstration of what is possible, watch this video:
The trouble with fuel injectors…
The symptoms of clogged, defective, or failed fuel injectors are many and varied, and some symptoms are easy to misdiagnose or ascribe to other causes, such a loss of compression, bad spark plugs, bad fuel, or even head gasket failures. Here are some typical symptoms of fuel injector problems:
- Hard starting
- Rough or erratic idling
- Poor fuel economy
- Increased emissions
- Damaged catalytic converter(s)
- Oil dilution that can cause engine failure
- Hydro-lock due to fuel leaking into cylinders. Hydro-locking can cause catastrophic engine failure, and many engines have been destroyed as a result of leaking fuel injectors.
There are in fact many other possible causes of the symptoms described above, so what do you do when you experience one or more of the above symptoms? How can you be sure you are dealing with a faulty injector, and not with something else that has similar symptoms?
The good news is, that it is possible to carry out definitive tests to isolate a defective injector, but the bad news is that the average DIY mechanic is limited to only a few basic tests that may, or may not identify faulty injectors as a cause of the symptoms described above. In the following section we will discuss the tests that can be performed on a DIY basis.
 The power test

Fuel injectors are controlled by a micro-processor that uses information from various sensors that are located around the engine to determine how long the injector should remain open to inject fuel into the engine. Fuel pressure does not figure in this- if the fuel pump is operational, and the fuel pressure regulator works as it should, there is a constant pressure in the fuel rail from which all the injectors are fed.
All that changes is the pulse width, or put in another way, how long the injector stays open and typically, pulse widths vary from less than a milli-second to about three milli-seconds, or slightly less depending on operating conditions. It is possible that on an engine with a severe misfire, one or more injectors might not receive a signal, hence the need to do the power test.
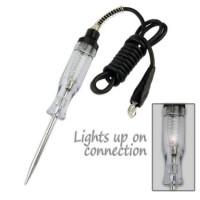
However, injectors are controlled by currents that are too low to check with a normal 12 volt test light. So to check if all the injectors are receiving triggering pulses, you need to use tool that is specifically designed to do this. All such a tool is, is a low voltage test light that plugs into the injector where the power feed would normally go.
The other end is plugged into the connector that would normally plug onto the injector, so what you have when both ends are plugged in, is an extension of the normal wiring harness, but with a test light attached. With the tool plugged in, you simply start the car and watch the test light. If the signal is OK, the test light will flash every time the signal passes through it. If the light does not flash, there is obviously a break in the wiring, or some other control-related issue, and the injector is therefore likely to be fine.
Injector test lights are available from almost all auto parts stores for a few dollars, and some may differ from the type described here, but all do the same thing, even if they work on different principles.
The resistance test
Since fuel injectors are solenoids, it can happen that the windings that control the movement of its internal components can develop all manner of issues.
The most common problem is a break in the internal winding, which means that the injector will not work even if the power test shows that it is receiving a triggering signal.
The way to test this is to check the resistance across the two pins in the electrical connector on the injector. However, you need the specific Ohm value for your car to get an accurate result, since all injectors are different. The electrical resistance of an injector is largely determined by the number of windings it has to control the moving parts, which means that the resistance across the windings will be different from one injector size to the next.
The repair manual for your car will specify the exact resistance value for your injectors, but don’t trust your gut feeling on this. Injectors need to have a specific electrical resistance to work- if you find a high or low value, you can take it as gospel that there is something wrong with that injector.

The leak-down test
Fuel injectors are nothing but electronically operated solenoids, but because they work under very high pressures, it is almost inevitable that some of their internal components will start leaking at some point. When this happens, fuel leaks past the sealing mechanism when the injector is closed.
Typical symptoms of leaking injectors are poor fuel economy, increased emissions and damaged catalytic converter(s), engine after run (also known as dieseling) after switching the engine off, rough idling, and hard starting particularly when the engine is hot.
The test for this is a little more technical, but it basically involves testing the pressure in the fuel rail, and seeing if it drops. For this test you need a dedicated fuel pressure gauge, and a device that can trigger each injector individually. Both items are available from larger auto parts stores, or dedicated tool dealers.
Most injector triggering devices can control only one injector at a time, but more elaborate set-ups that can control all the injectors are available- if you are willing to pay the asking price of these set-ups. Nonetheless, to do this test, you need to attach the fuel pressure gauge to the test valve on the fuel rail, and switch the ignition on so that the fuel pump can pressurise the system.
Be aware though that if you don’t start the engine, the fuel pump will only work for about two seconds before it senses that the engine is not running. Nonetheless, two seconds should be enough to pressurise the system, which you will see on the fuel gauge.
Assuming that the injector triggering device is hooked up and ready to work, watch the pressure gauge to see if the indicator needle remains constant. If it does, it means that all the injectors are closed, and that the pressure regulator on the fuel rail is working.
Watch the gauge for at least a few minutes to confirm that the pressure in the fuel rail is not dropping. If the pressure remains constant, operate the triggering device to open and close an injector. The pressure will drop marginally, but make a note of by how much it drops. After dropping, the pressure should again remain constant.
 Interpreting the results
 Interpreting the results
Repeat this process for all the injectors, and compare the results to see on which injectors the pressure drop was the biggest. Now here comes the tricky part; if there was no pressure drop on a particular injector, it could mean that it is clogged, or that it has some other internal defect that interferes with the flow of fuel through it.
On the other hand, a significant pressure drop may be due to a leak in the injector, or an issue with the pulse width, meaning that it stayed open for longer than it should have. It is not easy to differentiate between these two possible causes of a pressure drop, and the best thing to do is to have the pulse width measured with a proper diagnostic computer to eliminate, or confirm the possibility that the triggering device had caused the increased pulse width.
So what comes next?
From a safety perspective, the three tests outlined above are about the only things a DIY mechanic can do to troubleshoot fuel injectors. Nonetheless, assuming that one or more of these tests have identified one or more defective injectors, they need to be replaced, but how to get them out of the engine?
Some injectors are vastly more difficult to remove than others, but in general terms, the guiding principles are the same for all engines, with the exception of some diesel engines that require special equipment and tools to unscrew the injectors from the engine. In the next section, we will look at how to remove injectors from most gasoline engines. For a practical demonstration on how to remove injectors, watch this video:
How to replace fuel injectors
In almost all cases, you will need more than basic tools, At a minimum, you will need:
- A repair manual for your car
- Replacement injectors that are identical to the existing injectors
- Code saving device
- A ½-inch drive socket set
- A set of combination wrenches
- Phillips screwdrivers
- Flat-bladed screwdrivers
- Needle-nosed pliers
- Set of Allen wrenches
- Rubber grease
- Disposable rubber gloves
- Full face safety shield
Step 1- Disconnect the battery
Since you will be releasing raw fuel, it is always a good idea to disconnect the battery to prevent the possibility of fire. Make sure the ignition is in the “OFF” position, and disconnect the battery.
WARNING: Do not disconnect the battery unless you have a code saving device in place. Without such a device to keep critical systems powered up while the battery is disconnected, the radio might stop working, but worse, the vehicles’ electrical control modules could lose vital bits of programming, and in some cases, these modules cannot be reprogrammed.
Step 2- Release the residual system pressure
Consult the manual to locate the pressure testing point on the fuel rail, and follow the instructions on how to release the pressure in the system. Be aware that fuel can squirt out of the valve under very high pressures, so be sure to wear suitable protective gear during this step.
Step 3- Clear the field
This article cannot provide detailed instructions on the exact procedures to follow when removing injectors from all possible applications, so consult the repair on which items need to be removed to gain access to the injectors.
Assuming that the fuel rail is now clear, consult the manual to locate the bolts that secure the rail onto the engine. Remove these bolts, and place them aside. Be sure to remove the electrical connectors from the injectors at this point as well.
NOTE: You will need to remove anything that prevents you from lifting the entire fuel rail away from the engine. In some cases, it is possible to detach the fuel rail from all the injectors by removing securing clips, but in all cases, you need to follow the advice and procedures in the manual exactly to prevent damage to other, unrelated components.
Step 4- Remove the fuel rail from the engine
On four cylinder engines it often possible to remove the fuel rail with all the injectors attached. On V6 and V8 engines, it is always easier to remove the securing clips that hold the injectors to the fuel rail before removing the rail. This leaves the injectors in the engine, which makes it easy to pull only the affected injector(s) out of the manifold.
NOTE: Be aware that if the injectors have not been removed before, you might need to use some force to pull the injector out of the manifold. Injectors are only held in place in the manifold with rubber O-rings that can become hard over time, which can make it difficult to dislodge them.
Step 5- Replace the defective injector(s)
Assuming that the defective injector(s) are out of the engine, be sure to apply some rubber grease to the O-rings before installing the new injectors, to prevent damage to the O-rings when the injectors are seated in the manifold. Even the slightest damage to the O-rings can cause vacuum leaks, so use extreme care not to damage the O-rings.
Step 6- Re-assemble the fuel system
Re-assembly is in the exact reverse order of removal, but make double sure the clips that secure the injectors to the fuel are in place, and properly seated. Also pay close attention to the routing of wiring, piping, hoses, and vacuum lines to prevent mis-routing that could require you to disassemble the fuel system again.
Step 7- Test the repair
Once you are satisfied that everything is assembled correctly, and that you have no parts and/or fasteners left over, check the fuel line connections to make sure they are tight, and leak proof. Reconnect the battery, remove the code saving device, and re-check all electrical, fuel, and vacuum line connections to confirm that there are no loose ends, in a manner of speaking.
Start the engine to confirm that there are no fluid leaks, and that the engine runs smoothly.
The dangers of DIY fuel injector testing/cleaning
Sadly, there are thousands of internet resources that claim that it is possible to for DIY mechanics to check and clean fuel injectors with gadgets and doo-dads that can he had from Wal-Mart, Amazon, eBay, and other outlets for less than $50.
The simple truth is that these gadgets are less than useless, but more importantly, they pose a very real risk of causing fire, personal injury, and fatal damage to the vehicle’s electrical and fuel systems. The only reliable way to clean and check injectors is by using equipment that is designed specifically for the purpose of cleaning injectors.
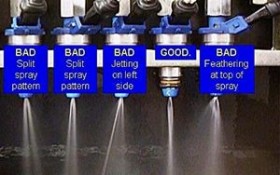
The image above clearly shows what the spray pattern from a good injector should look like. There is simply no way a DIY procedure can detect poor spray patterns, and any attempt to rectify, modify, or correct a spray pattern is sure to damage the injector even more, so DON’T try it.
If injectors need cleaning, the better option is always to leave the procedure to a specialist repair shop that has access to the correct equipment. The image above shows five injectors that are hooked up to a calibration machine. In this case, all five injectors are delivering exactly the same amount of fuel, but only one is doing so efficiently.
The other four are partially clogged, and the only way to unclog them is with specialized equipment that can cost upward of $10 000. In the real world, this means that if $50 gadgets from Wal-mart can do the same job just as effectively, there would be no need for specialized equipment that uses ultra-sound baths to remove carbon deposits from injector orifices. Just saying…
Thanks for reading!
Image credit: https://www.injectorrx.com/diy-fuel-injector-cleaning/


No Comments